

How to Lay a Gravel Driveway? A Complete Step-by-Step Guide:
Learn how to lay a gravel driveway with this comprehensive DIY guide. From planning and excavation to compacting and finishing — we cover everything you need to know.
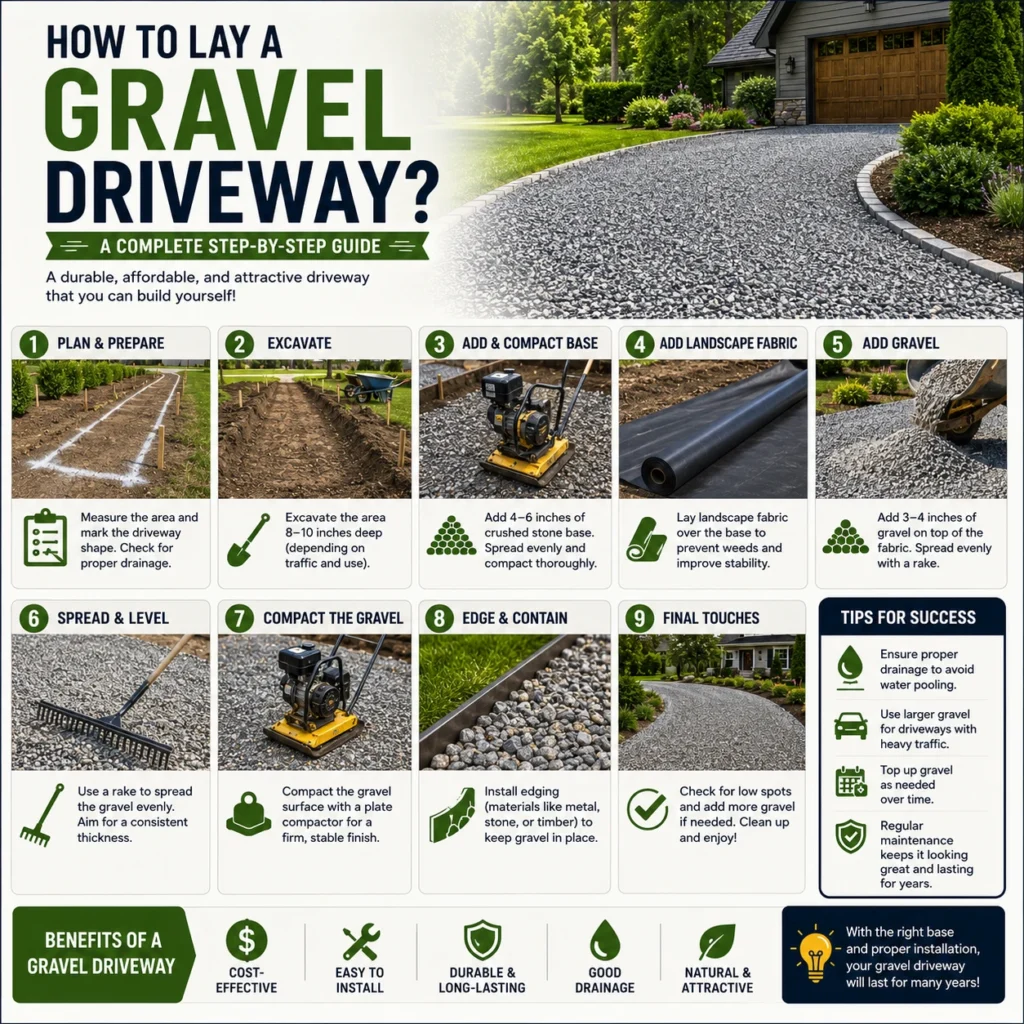
Introduction
Planning to install a gravel driveway? Whether you’re a DIY enthusiast or a homeowner looking to upgrade your property, a gravel driveway is an affordable, attractive, and eco-friendly choicPlanning to install a gravel driveway? Whether you’re a DIY enthusiast or a homeowner looking to upgrade your property, a gravel driveway is an affordable, attractive, and eco-friendly choice. This how to lay a gravel driveway guide covers everything you need to know. Gravel driveways allow water to drain naturally, reducing flood risk and preventing water pooling — something concrete and tarmac drives simply can’t match.
But here’s the thing: laying a gravel driveway the right way takes more than just dumping stones on the ground. You need proper planning, a solid sub-base, the right materials, and — most importantly — the right quantity of gravel.
Before you start digging, use our free gravel calculator to determine exactly how much gravel, sub-base, and other materials you’ll need for your project. This gravel estimator takes the guesswork out of ordering and helps you avoid costly over-ordering or frustrating mid-project shortages.
Why Choose a Gravel Driveway?
Gravel driveways offer several advantages over traditional paving options:
| Benefit | Why It Matters |
|---|---|
| Permeable Drainage | Water drains naturally, reducing runoff and flood risk |
| Cost-Effective | Significantly cheaper than concrete, asphalt, or block paving |
| DIY-Friendly | Straightforward enough for most homeowners to tackle |
| Low Maintenance | Easy to repair — just top up with fresh gravel |
| Aesthetic Appeal | Available in various colors and textures to suit any style |
| Security | The crunch of gravel underfoot acts as a natural intruder alarm |
Materials You’ll Need
Before you start, gather these essential materials and tools:
| Material/Tool | Purpose |
|---|---|
| Gravel (20mm angular chippings) | The top decorative layer — angular stones interlock better |
| MOT Type 1 Sub-Base | The load-bearing foundation for your driveway |
| Geotextile Weed Membrane | Prevents weeds and keeps gravel clean |
| Edging Materials | Keeps gravel contained and prevents “gravel creep” |
| Wacker Plate / Plate Compactor | For compacting sub-base and gravel |
| Square-Ended Shovel | For digging and spreading |
| Steel Rake | For leveling gravel evenly |
| Spirit Level | To check for evenness and proper drainage |
| Wheelbarrow | For moving materials |
| Pegs and String | For marking out the driveway area |
Pro Tip: Use our gravel quantity calculator to figure out exactly how much gravel and sub-base you need. A gravel needed calculator saves you time and money by giving you precise estimates before you order. Refer to the materials table above for accurate selection — and see the maintenance section below for long-term care tips
Gravel Driveway Preparation Checklist
Before you dig, walk through this checklist. Most driveway failures trace back to a step skipped here, not the gravel itself.
- Mark the area and confirm you don’t need a driveway permit or utility locate (call 811 or your local equivalent before digging)
- Excavate down to a solid subgrade — ideally rock, or at minimum stable, compacted subsoil, never loose topsoil
- Set a crowned or sloped grade before adding any material — this is your first line of defense against pooling and erosion
- Plan your total depth by soil type and traffic: light foot traffic can get away with 4 inches, but vehicle driveways on soft or clay soil often need 8-12 inches
- Order 10-15% extra gravel to cover compaction settling and uneven ground
Step-by-Step Guide: How to Lay a Gravel Driveway
Step 1: Planning and Preparation
Measure and Mark the Driveway Area
Start by marking out where you want your new gravel driveway to be. Use pegs and string for straight edges, or spray paint for curved areas.
Once marked, measure the length and width of the area. Multiply these numbers to get the total square footage.
Formula: Area (sq ft) = Length × Width
Example: A driveway that is 20 feet long and 10 feet wide has an area of 200 square feet.
Use a gravel calculator to determine how much gravel and sub-base you’ll need. This driveway gravel calculator gives you instant estimates in cubic yards and tons — so you order the right amount every time. Proper planning at this stage saves you from costly mistakes later.
Check Permissions
Before you dig, check if you need planning permission. If your driveway accesses a public road, you may need a driveway permit. Also, check for any underground services like gas, water, or electricity lines.
Step 2: Dig Out the Area
Excavate to the Right Depth
Now comes the hard work — digging. For a proper gravel driveway, you need to dig to a total depth of at least 200mm (8 inches).
For more detailed excavation tips, visit Decorative Aggregates’ 7-step gravel driveway guide..
| Layer | Depth |
|---|---|
| Sub-Base (MOT Type 1) | 150mm (6 inches) — compacted |
| Gravel Layer | 50mm (2 inches) |
Total Depth: 200mm (8 inches)
Pro Tip: For heavy vehicles or poor soil conditions, increase sub-base depth to 200mm+ and gravel depth to 100mm (4 inches).
Remove all grass, topsoil, and organic matter. Dig down to firm, stable ground — not loose topsoil.
For large driveways, consider hiring a mini digger to save time and effort.
Step 3: Install Edging
Why Edging Matters
Edging keeps your gravel contained and prevents it from spreading into lawns or flower beds. Without edging, gravel will “creep” over time, especially when driven over.
Edging Material Options:
| Material | Pros |
|---|---|
| Metal (Steel/Aluminum) | Durable, economical, easy to install |
| Brick | Timeless look, permanent |
| Concrete Curb | Most permanent, cleanest edge |
| Natural Stone | Organic, premium aesthetic |
| Timber | Budget-friendly, rustic look |
How to Install:
- Dig a trench along the driveway perimeter — about 4 inches deep and 6-12 inches wide
- Install your chosen edging material flush with or slightly above ground level
- Secure edging firmly in place
Step 4: Lay the Sub-Base
Create a Solid Foundation
The sub-base is the most critical part of your gravel driveway. It supports the weight of vehicles and prevents the gravel from sinking into the soil.
What to Use:
Use MOT Type 1 or a similar crushed aggregate. This material contains various sized pieces that compact together to form a solid, load-bearing surface.
How to Lay:
- Spread the sub-base material evenly across the excavated area
- Aim for a depth of 150mm (6 inches) before compaction
- Compact using a wacker plate or vibrating plate compactor
- Compact in 2-3 inch layers for best results
- The finished sub-base should be firm, level, and slope slightly away from buildings for drainage
Pro Tip: Use a gravel volume calculator to determine how much sub-base material you need. This gravel estimator gives you accurate quantities in cubic yards.
Instructables also has a detailed, photo-by-photo gravel driveway installation tutorial covering base preparation.”
Step 5: Lay Weed Membrane
Why You Need a Weed Membrane
A geotextile weed membrane is essential for a long-lasting gravel driveway. It:
- Prevents weeds from growing through the gravel
- Keeps the gravel clean by separating it from soil
- Prevents the sub-base from mixing with the soil below
- Adds stability to the driveway surface
How to Lay:
- Roll out heavy-duty geotextile landscape fabric over the compacted sub-base
- Overlap joints by at least 10cm (4 inches) to prevent weed gaps
- Peg the membrane firmly in place
- Use a polypropylene membrane for driveways — it’s harder wearing and more durable
Important: Don’t skip the membrane! Laying gravel directly on soil leads to sinking, mud, and weed problems within one season.
Step 6: Add and Spread the Gravel
Choose the Right Gravel
For driveways, choose 20mm angular chippings. Angular stones interlock when compacted, creating a stable surface. Avoid rounded stones like pea gravel — they shift under vehicle weight and don’t compact well.
Popular driveway gravel types include granite chippings, golden gravel, moonstone, black ice, and heritage quartz.
How to Spread:
- Pour the gravel onto the weed membrane
- Use a steel rake to spread it evenly
- Aim for a depth of 50mm (2 inches) after compaction
- For heavy traffic areas, increase gravel depth to 75-100mm (3-4 inches)
Pro Tip: Use a pea gravel calculator if you’re considering pea gravel for light-use areas, but for driveways, stick with angular crushed stone.
Step 7: Compact the Gravel
Don’t Skip This Crucial Step!
Compacting is often overlooked but is essential for a stable, long-lasting gravel driveway. Proper compaction:
- Locks gravel pieces together
- Creates a solid, firm surface
- Prevents gravel from shifting or washing away
- Improves load-bearing capacity and drainage
How to Compact:
- Rake the gravel to ensure it’s evenly distributed
- Lightly mist the gravel with water — this helps pieces settle and lock together
- Compact in 2-inch layers using a plate compactor (or hand tamper for small areas)
- Run the compactor over the entire surface until firm and flat
Pro Tip: About 4 to 6 inches of gravel should be used, compacted in 2-inch layers. You can add another layer of 2-3 inches of smaller decorative gravel on top for a polished finish.
Step 8: Final Checks and Finishing Touches
Check for Evenness
Use a spirit level to check that the surface is even. Crown your driveway. A convex (crowned) surface profile is standard practice — build the center about half an inch higher per foot of width than the edges. This sheds water to both sides instead of letting it pool in the middle, which is the single most common cause of premature rutting. (Source: Hunker, gravel driveway mistakes guide)
Finishing Touches:
- Add decorative aggregates for enhanced curb appeal
- Consider gravel grids for extra stability in high-traffic areas
- Install a gravel mat at the driveway entrance to prevent tracking
Congratulations! You’ve successfully laid a gravel driveway.
How to Maintain Your Gravel Driveway
A well-maintained gravel driveway can last for decades. Here’s how to keep it looking great:
| Maintenance Task | Frequency |
|---|---|
| Rake to redistribute displaced gravel | As needed / after heavy rain |
| Top up with fresh gravel | Every 1-2 years |
| Remove weeds (use vinegar or weed torch) | As needed |
| Re-compact high-traffic areas | Annually |
| Check edging for damage | Annually |
Common Mistakes to Avoid
| Mistake | Why It’s a Problem |
|---|---|
| Skipping the sub-base | Gravel sinks, becomes muddy within one season |
| Too much or too little gravel | Too deep = difficult to walk/drive on; too shallow = membrane shows through |
| Ignoring drainage | Water pooling damages driveway and foundations |
| Using rounded gravel | Doesn’t compact, shifts under weight |
| Skipping compaction | Loose surface, gravel washes away |
| No weed membrane | Weeds grow through, gravel gets dirty |
DIY vs. Professional Gravel Driveway Installation Cost
Not everyone wants to dig and compact a driveway themselves. Here’s how DIY and professional installation actually compare on cost, based on 2026 U.S. pricing data.
Most homeowners pay $4 to $10 per square foot for a professionally installed gravel driveway, materials and labor included. Doing it yourself usually costs $1 to $10 per square foot in materials alone, since you’re only paying for gravel, sub-base, and tool rental — not labor.
| Driveway Size | DIY Materials Cost | Professional Installation Cost |
|---|---|---|
| Single-car (200–300 sq ft) | $250 – $900 | $800 – $1,800 |
| Double-car (400–600 sq ft) | $800 – $2,200 | $1,800 – $4,000 |
| Long/rural (2,000 sq ft) | $3,500 – $6,000 | $8,000 – $20,000 |
Labor typically makes up about half the total professional cost, and most contractors charge $30 to $100 per hour per worker. A standard driveway takes a professional crew of 2–3 workers 1 to 3 days. DIY takes longer if it’s your first time — expect a full weekend for a single-car driveway once you include excavation, compaction, and letting the base settle.
Hiring a pro makes sense if your site has heavy clay soil, needs excavation equipment, or if you’re regrading an old driveway (demolition alone can add roughly $4,750 for asphalt removal). DIY makes sense for smaller, flat sites where you’re comfortable renting a plate compactor for a weekend. Use our gravel cost per ton guide to price out materials either way.
Frequently Asked Questions About How to Lay a Gravel Driveway:
Here are the common questions which peoples are frequently asking.
How much gravel do I need for a driveway?
For a standard two-car driveway measuring 24×24 feet with a 3-inch depth, you’ll need approximately 4.3 cubic yards or about 6 tons of gravel. For a 4-inch depth, increase that to about 5.7 cubic yards or 8 tons. Use our gravel calculator to get exact estimates for your specific project.
How deep should a gravel driveway be?
A gravel driveway should have a total depth of at least 200mm (8 inches) — 150mm (6 inches) of compacted sub-base and 50mm (2 inches) of gravel. For heavy vehicles, increase sub-base to 200mm+ and gravel to 100mm (4 inches).
What is the best gravel for a driveway?
Crushed stone or angular chippings (20mm) are best for driveways. Angular edges interlock when compacted, creating a stable surface. Avoid rounded pea gravel — it shifts under weight and doesn’t compact well.
Should I use a weed membrane under a gravel driveway?
Yes, absolutely. A geotextile weed membrane prevents weeds, keeps gravel clean, and stops the sub-base from mixing with soil. Use a heavy-duty polypropylene membrane for driveways.
How do you compact a gravel driveway?
Rake the gravel evenly, lightly mist with water, then compact in 2-inch layers using a plate compactor (or hand tamper for small areas). Compact each layer thoroughly before adding the next.
Can I lay a gravel driveway myself?
Yes! Laying a gravel driveway is straightforward enough for most DIY enthusiasts. It’s hard work (lots of digging), but with proper planning, the right tools, and this guide, you can do it yourself.
How much does a gravel driveway cost?
Costs vary based on materials, size, and location. Use our gravel cost estimator to get accurate pricing for your project. Generally, gravel driveways are significantly cheaper than concrete, asphalt, or block paving.
Do I need to remove the topsoil before installing a gravel driveway?
Yes. Topsoil holds water like a sponge and expands and shrinks with moisture, which makes gravel sink and shift over time. Strip it down to firm, stable subsoil before adding your sub-base — skipping this is one of the most common first-timer mistakes reported by DIYers.
Is it cheaper to install a gravel driveway myself, or hire a professional?
A properly installed gravel driveway — solid sub-base, correct depth, good drainage — typically lasts 10 to 15 years structurally, and can go longer with regular maintenance.
How long does a gravel driveway last?
How long does a gravel driveway last?
A properly installed gravel driveway — solid sub-base, correct depth, good drainage — typically lasts 10 to 15 years structurally, and can go longer with regular maintenance. Skipping the sub-base or drainage steps above can cut that well under 10 years. (Source: T&M Driveways)
How much does it cost to install pea gravel instead of crushed stone?
Pea gravel isn’t recommended for driveways because it shifts under vehicle weight and won’t compact. Pea gravel runs $25-$53 per ton compared with crushed stone’s $10-$50 per ton.
Related Tools & Resources:
Explore our other tools and resources
- Gravel Calculator
- Gravel Depth Guide
- Pea Gravel vs Crushed Stone
- Gravel Cost Per Ton Guide
- Cubic Yard Calculator
- Gravel Yards to Tons Calculator
- Stone Calculator
- Cubic Feet Calculator
- Pea Gravel Calculator Guide
- French Drain Guide
- All Gravel Guides
Use Our Free Gravel Calculator:
Planning your gravel driveway? Use our free gravel calculator to estimate exactly how much gravel, sub-base, and other materials you need. This online gravel estimator gives you instant results in cubic yards, tons, and total cost.
Simply enter your driveway dimensions, select gravel type, add waste factor, and get accurate estimates in seconds. Plan your project with confidence and order the right amount every time.
Last Updated: Sep 14 at 1:00