

French Drain Installation Guide: Step-by-Step DIY Guide:
Learn how to install a French drain with this comprehensive DIY guide. From planning and excavation to gravel selection and finishing — we cover everything you need to know to keep your property dry.
Introduction
Does your yard turn into a swamp after heavy rain? Are you dealing with water pooling around your foundation, basement leaks, or soggy lawns? A French drain is the solution you’ve been looking for.
A French drain is a simple, effective drainage system that redirects water away from problem areas. It consists of a trench filled with gravel and a perforated pipe that collects and channels water to a safe discharge point.
The key to a successful French drain is using the right materials — especially the right type and quantity of gravel. Clean, angular crushed stone allows water to flow freely and prevents clogging.
Before you start digging, use our free gravel calculator to determine exactly how much gravel you need for your French drain project. This gravel estimator gives you instant results in cubic yards and tons — so you order the right amount every time.
What is a French Drain?
A French drain is a trench filled with gravel and a perforated pipe that redirects surface water and groundwater away from an area. It was named after Henry French, who popularized the design in the 19th century. For more detailed historical and technical information, refer to the Mississippi State University Extension and LSU AgCenter resources on drainage systems.
| Feature | Description |
|---|---|
| Purpose | Redirects water away from problem areas |
| Components | Trench, gravel, perforated pipe, geotextile fabric |
| Depth | Typically 8-12 inches minimum |
| Width | At least 6 inches wide |
| Gravel Type | Clean, angular crushed stone |
How a French Drain Works
- Water enters the trench through the gravel and geotextile fabric
- Water flows into the perforated pipe through small holes
- The pipe channels water to a safe discharge point (dry well, ditch, or storm drain)
- Water is directed away from foundations, basements, or soggy areas
Why Install a French Drain?
| Reason | Why It Matters |
|---|---|
| Prevent Basement Flooding | Keeps water away from foundations |
| Protect Foundation | Prevents water damage and structural issues |
| Eliminate Soggy Lawns | Drains standing water from yard |
| Prevent Erosion | Controls water flow and soil erosion |
| Reduce Mosquito Breeding | Eliminates standing water |
| Increase Property Value | According to Washington State University Extension, proper yard drainage is one of the most cost-effective home improvements. |
| Improve Lawn Health | Prevents waterlogging and root rot |
Materials and Tools You’ll Need
| Material/Tool | Purpose |
|---|---|
| Clean Crushed Stone (¾-1 inch) | For drainage — allows water to flow freely |
| Perforated Drain Pipe (4 inch) | Collects and channels water |
| Geotextile Landscape Fabric | Prevents clogging from soil and debris |
| Pipe Connectors and Fittings | Connects pipe sections |
| Pipe Elbows (45° or 90°) | Directs pipe around corners |
| Outlet Pipe | Directs water to discharge point |
| Dry Well (if needed) | Disperses water underground |
| Shovel / Spade | For digging trench |
| Pickaxe | For breaking hard soil or rocks |
| Wheelbarrow | For moving gravel |
| Metal Rake | For leveling gravel |
| Spirit Level | For maintaining proper slope |
| String Line | For marking trench direction |
Pro Tip: Use our gravel quantity calculator to figure out exactly how much gravel you need for your French drain. A gravel needed calculator saves you time and money by giving you precise estimates before you order.
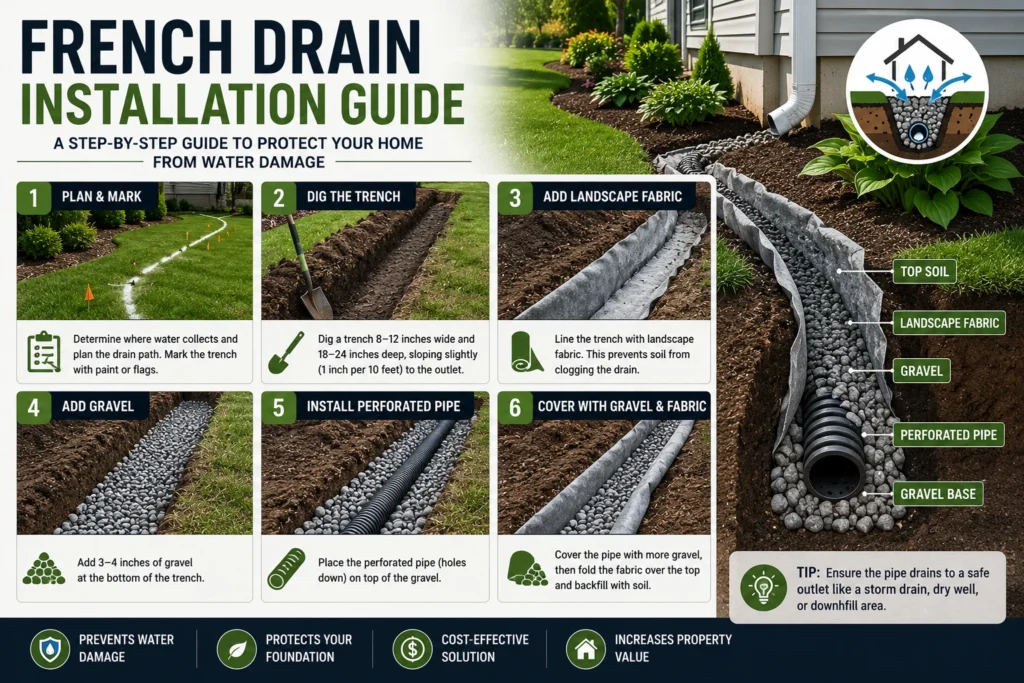
Step-by-Step Guide: How to Install a French Drain
Step 1: Planning and Design
Identify Problem Areas
Walk around your property after heavy rain. Look for:
- Water pooling near foundations
- Soggy, waterlogged lawn areas
- Water flowing toward your house
- Basement leaks or damp walls
- Erosion or soil displacement
Choose the Discharge Point
Water must go somewhere. Choose a safe discharge point:
- Downhill slope: Gravity will carry water away
- Storm drain: If available and permitted
- Dry well: A hole filled with gravel that disperses water underground
- Ditch or drainage swale: Natural drainage area
- Sump pump: For water that can’t drain by gravity
Check Permissions
Before you dig:
- Call 811 (USA) to mark underground utilities
- Check local building codes for drainage requirements
- Ensure discharge point is legal (not into sewer systems without permission)
Step 2: Mark and Dig the Trench
Mark the Trench Path
Use string line or spray paint to mark the path of your French drain. Plan a path that:
- Collects water from problem areas
- Follows a downhill slope
- Directs water to your chosen discharge point
Trench Dimensions
| Dimension | Standard Size |
|---|---|
| Depth | 8-12 inches minimum (for residential) |
| Width | 6-12 inches wide (minimum) |
| Slope | 1-2% grade (1-2 feet per 100 feet) |
Dig the Trench
- Dig along your marked path
- Maintain a consistent depth and width
- Follow the downhill slope (1-2%)
- Use a pickaxe if the soil is hard or rocky
- Remove all rocks, roots, and debris from the bottom
Pro Tip: The trench should slope at least 1% (about 1 foot of drop per 100 feet of trench) to ensure water flows by gravity.
Step 3: Add Gravel Base
Why Gravel Base is Essential
A gravel base provides:
- Drainage: Allows water to flow freely
- Support: Prevents pipe from sinking or shifting
- Filtration: Separates pipe from soil and debris
- Stability: Provides a solid foundation for the pipe
How to Add Gravel Base:
- Pour a 2-3 inch layer of clean crushed stone into the bottom of the trench
- Rake to level
- Trench bottom should slope toward discharge point (1-2% grade)
Gravel Type: Use clean, angular crushed stone (¾-1 inch). Avoid rounded pea gravel — it doesn’t allow water to flow as freely.
Step 4: Install Geotextile Fabric (Optional but Recommended)
Why Geotextile Fabric is Recommended
While not always required, landscape fabric helps:
- Prevent soil and debris from clogging gravel
- Extend the life of your French drain
- Keep gravel clean and free-flowing
How to Install:
- Roll geotextile landscape fabric along the trench
- Center the fabric in the trench
- Leave enough fabric on both sides to wrap over the gravel
- Fabric should extend at least 6 inches beyond the trench edges
Pro Tip: Use non-woven geotextile fabric specifically designed for drainage. Avoid landscape fabric that’s too dense — it can slow water flow.
Step 5: Lay the Perforated Pipe
Choose the Right Pipe
Use 4-inch perforated corrugated pipe with holes on one side. Perforated pipe collects water through its holes and channels it away.
How to Lay the Pipe:
- Place the perforated pipe on top of the gravel base
- Holes should face DOWN (toward the gravel) to collect water rising from below
- Connect pipe sections with couplers or fittings
- Use elbows to turn corners
- Run the pipe all the way to the discharge point
Common Mistakes to Avoid:
| Mistake | Why It’s a Problem |
|---|---|
| Holes facing up | Collects debris, clogs easily |
| No slope | Water won’t flow by gravity |
| Low spots | Water pools in pipe |
| Sharp corners | Pipe kinks, restricts flow |
Step 6: Cover with Gravel
Add Gravel Over the Pipe
- Pour gravel over the pipe to a depth of 8-12 inches
- Make sure gravel completely covers the pipe
- Use a rake to spread gravel evenly
- Ensure the gravel layer is at least 2 inches above the pipe
How Much Gravel Do You Need?
Use our gravel calculator to estimate exactly how much gravel you need for your French drain. This gravel estimator gives you instant results in cubic yards and tons.
Formula: Volume = Trench Length × Trench Width × Gravel Depth
Example: A 50-foot French drain at 12 inches wide and 10 inches deep requires approximately:
- 2.3 cubic yards of gravel
- 3.2 tons of gravel (at 1.4 tons per cubic yard)
Step 7: Wrap Geotextile Fabric
Wrap Fabric Over Gravel
- Fold the excess geotextile fabric over the gravel
- Overlap fabric at least 6-12 inches
- Fabric should completely cover the gravel and pipe
- This prevents soil from filtering down into the gravel over time
Alternative Approach:
Some homeowners place the fabric on top of the trench after filling, leaving about 2 inches of gravel below the fabric and topsoil above.
Important: If you use the alternative approach, ensure the gravel layer below the fabric is deep enough to allow water to flow freely.
Step 8: Backfill and Finish
Add Topsoil
- Backfill the trench with excavated soil
- Remove large stones and debris before backfilling
- Add topsoil to about 2-3 inches above ground level (to allow for settling)
- Slightly mound the soil over the trench (it will settle over time)
Finish the Surface:
| Option | Description |
|---|---|
| Grass | Plant grass seed or lay sod over the backfilled area |
| Decorative Gravel | Add 2-3 inches of decorative gravel as a top dressing |
| Native Plants | Plant native, water-tolerant plants over the area |
Test Your French Drain:
- Wait for a heavy rain or use a garden hose to test
- Water should flow through the pipe and exit at the discharge point
- Check for pooling or slow drainage
- If water doesn’t flow, check for clogs or insufficient slope
How Much Gravel Do You Need for a French Drain?
Use this table to estimate gravel requirements for common French drain sizes:
| Trench Length | Trench Width | Gravel Depth | Gravel Needed (Cubic Yards) | Gravel Needed (Tons) |
|---|---|---|---|---|
| 10 feet | 6 inches | 8 inches | 0.15 | 0.21 |
| 20 feet | 6 inches | 8 inches | 0.30 | 0.42 |
| 30 feet | 6 inches | 8 inches | 0.44 | 0.62 |
| 50 feet | 6 inches | 8 inches | 0.74 | 1.04 |
| 50 feet | 12 inches | 10 inches | 1.85 | 2.59 |
| 100 feet | 12 inches | 10 inches | 3.70 | 5.18 |
Calculate exactly: Use our gravel calculator for precise estimates based on your specific project dimensions.
French Drain Cost Estimate
| Cost Component | Estimated Cost |
|---|---|
| Gravel (per ton) | $10 – $40 |
| Perforated Pipe (per 100 ft) | $30 – $80 |
| Geotextile Fabric (per 100 ft) | $20 – $50 |
| Fittings and Connectors | $10 – $30 |
| Total (DIY, 50 ft drain) | $150 – $400 |
| Total (Professional installation, 50 ft) | $500 – $1,500 |
Use our gravel cost estimator to budget accurately for your French drain project.
Common Mistakes to Avoid
| Mistake | Why It’s a Problem | Solution |
|---|---|---|
| Holes facing up | Pipe clogs with debris | Holes face down |
| Insufficient slope | Water doesn’t flow | Maintain 1-2% slope |
| Using wrong gravel | Poor drainage | Use clean, angular crushed stone |
| Skipping geotextile fabric | Pipe and gravel clog | Always use fabric |
| No gravel below pipe | Pipe not supported | 2-3 inches of gravel base |
| Discharging to bad location | Water problems recur | Choose safe discharge point |
| Digging without checking utilities | Dangerous and costly | Always call 811 |
Frequently Asked Questions
How much gravel do I need for a French drain?
For a standard 50-foot French drain at 12 inches wide and 10 inches deep, you’ll need approximately 1.85 cubic yards or 2.6 tons of gravel. Use our gravel calculator for exact estimates.
What gravel is best for a French drain?
Clean, angular crushed stone (¾-1 inch) is best for French drains. Angular stones allow water to flow freely through the gaps. Avoid rounded pea gravel — it compacts too tightly and restricts water flow.
How deep should a French drain be?
A French drain should be at least 8-12 inches deep for residential applications. For areas with heavy clay soil or high water tables, increase depth to 12-18 inches.
How wide should a French drain be?
A French drain should be at least 6 inches wide. For better drainage, 12 inches is recommended. Width should be sufficient to accommodate the pipe and 2-3 inches of gravel on all sides.
Do I need a perforated pipe in a French drain?
Yes, a perforated pipe is essential for a French drain. The pipe collects water through its holes and channels it away. Without a pipe, water drains slowly through gravel alone.
Which way do holes face in a French drain?
Holes face DOWN toward the gravel. This allows water rising from the gravel to enter the pipe. If holes face up, debris and sediment can clog the pipe.
Can I use pea gravel in a French drain?
Not recommended. Pea gravel’s rounded stones compact too tightly, restricting water flow. Use clean, angular crushed stone for French drains — it allows water to flow freely and prevents clogging.
How much does a French drain cost?
A DIY French drain (50 feet) costs approximately $150-$400 in materials. Professional installation costs $500-$1,500 for the same length. Costs vary based on location, soil conditions, and materials.
How long does a French drain last?
A properly installed French drain can last 30-50+ years. Using quality materials (clean gravel, perforated pipe, geotextile fabric) and proper maintenance extends the lifespan significantly.
How do I know if my French drain is working?
After a heavy rain, check the discharge point — water should be flowing out. If the area around the drain is still soggy or water pools, the drain may be clogged or the slope may be insufficient.
Related Tools & Resources
- Gravel Calculator — Get exact estimates for your French drain project
- Gravel Depth Guide — Find the right depth for every project
- Gravel Cost Per Ton Guide — Complete pricing breakdown
- How to Lay a Gravel Driveway — Step-by-step installation guide
- Pea Gravel vs Crushed Stone — Which is better for your project?
Use Our Free Gravel Calculator
Planning your French drain? Use our free gravel calculator to estimate exactly how much gravel you need for your project. This online gravel estimator gives you instant results in cubic yards, tons, and total cost.
Simply enter your trench dimensions, select gravel type, add waste factor, and get accurate estimates in seconds. Plan your project with confidence and keep your property dry.